Checkerboard
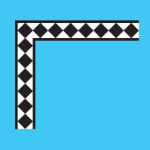
The easiest Sashing Stash design to turn corners with is the checkerboard, which is made up of 1″ squares. Let’s start with the basics, turning corners with one, two, or three rows of squares.
If possible, cut the strips of squares lengthwise, which will avoid the minor stretching that can occur with crosswise cuts, although careful handling of crosswise cuts is also fine.
It is best to plan your project ahead of time in order to have the checkerboard come out the way you want. For example, to have the corners end up all the same (either all light or all dark), the finished measurement of your blocks or quilt must be an odd number, such as 5″, 7″, 9″ for blocks, or 23″, 45″, 61″ etc. for the body of a quilt.
This illustration does not show seam allowances, but be sure to include a 1/4″ seam allowance all the way around when cutting Sashing Stash. Placing the 1/4″ mark on your ruler along the row of checks makes it easy to cut a 1/4″ seam allowance.
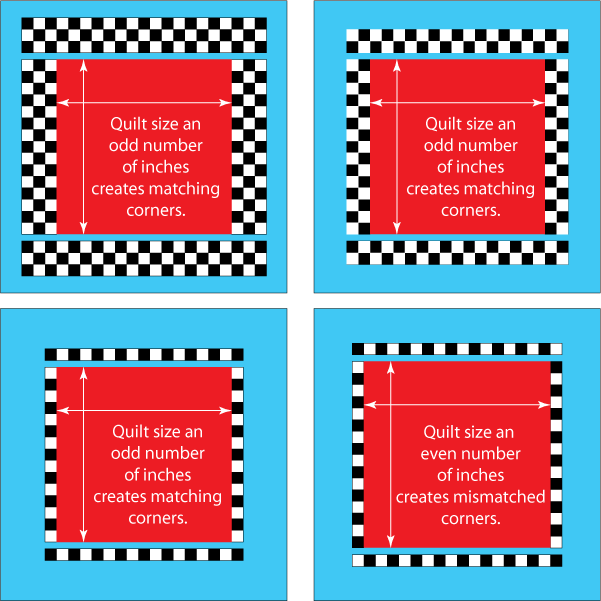
If your quilt or block measurement is an even number of inches, you will have mismatched corners, but careful planning will provide a continuous line of checks around your quilt or block (see illustration on the lower right, above).
If the dimensions of the quilt to which you are attaching the checkerboard banding are a fraction of an inch more or less than an even measurement—for example, 65 1/4″ inches (which would make your quilt 1/4″ longer than the appropriate cut of Sashing Stash for an odd number quilt of 65″), or 70 3/4″ inches (which would make your quilt 1/4″ shorter than the appropriate cut of Sashing Stash for an odd number quilt of 71″)—you can probably ease either the Sashing Stash or the quilt to fit. Up to 1/2″ over a longer length like this can probably be successfully eased. For a block however, not more than 1/8″ over or under might be successfully eased. Best to cut and sew accurately, though!
If, for some reason, you have a considerable difference between the Sashing Stash dimension and your project—such as starting with a UFO you found in the bottom of a drawer—you can get creative with solutions. There are many ways to do this, but one way to shorten checkerboard banding to fit, is to fold the fabric right sides together, exactly on the line between a light and a dark square and sew a tiny seam of 1/32″ in as many places as it takes to shorten the Sashing Stash strip to fit. A 1/32″ seam will take out 1/16″ inch of length. If done carefully, this “fudge” will show minimally.
 Another variation for turning corners with the Sashing Stash checkerboard is to miter the corners. Here is a sample mitered corner, providing extra eye appeal for a two-strip checkerboard border.
Half-Square Triangles
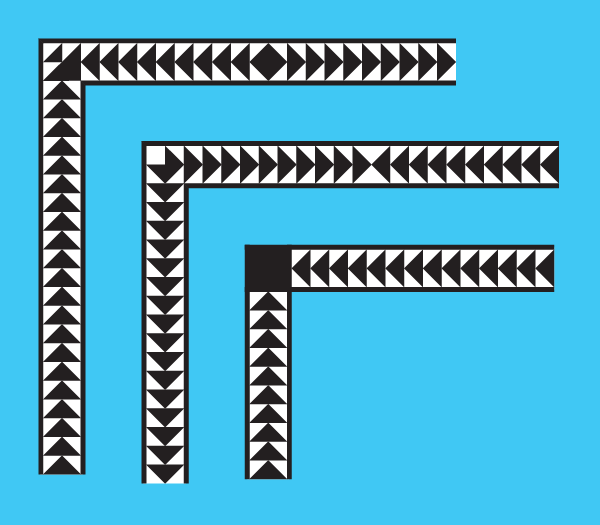
Half-Square Triangles are the most fun of all corner-turning geometrics, providing dozens of ways to play. First of all, here are three simple ways to turn corners:

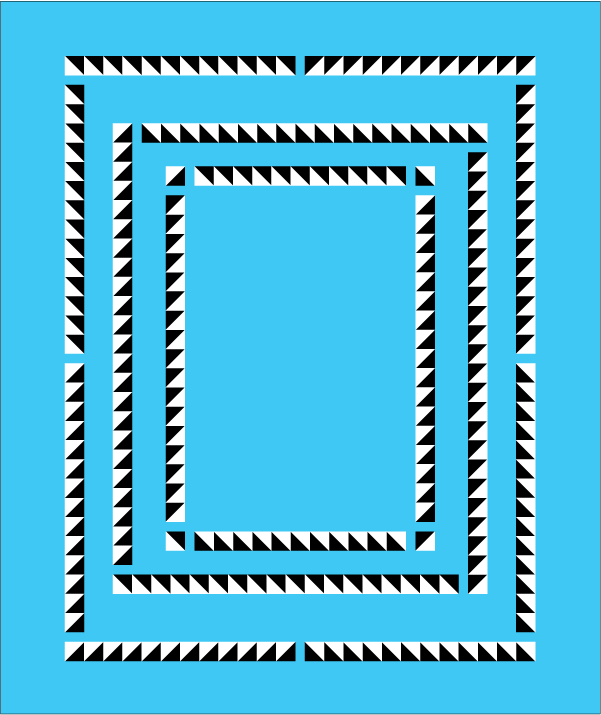
- In the illustration above, each sample shows a different technique as follows:
- Outer sample: The top and bottom bands have a dark outside edge while the sides have a light outside edge. Note that the triangle units change direction in the middle of each side in order to create the continuous design at the corners.
- Middle sample: All the outside edges are light, using a large triangle (formed by two smaller triangles) to turn corners. The construction of this border requires partial seaming.
- Inner sample: All the outside edges are dark, using a parallelogram to turn corners (formed by the arrangement of a separately cut single unit in each corner).
The illustration below shows the components that make up each border.
The example below turns the corners with an hourglass block made from two half-square triangle units sewn together, as described in the illustration.
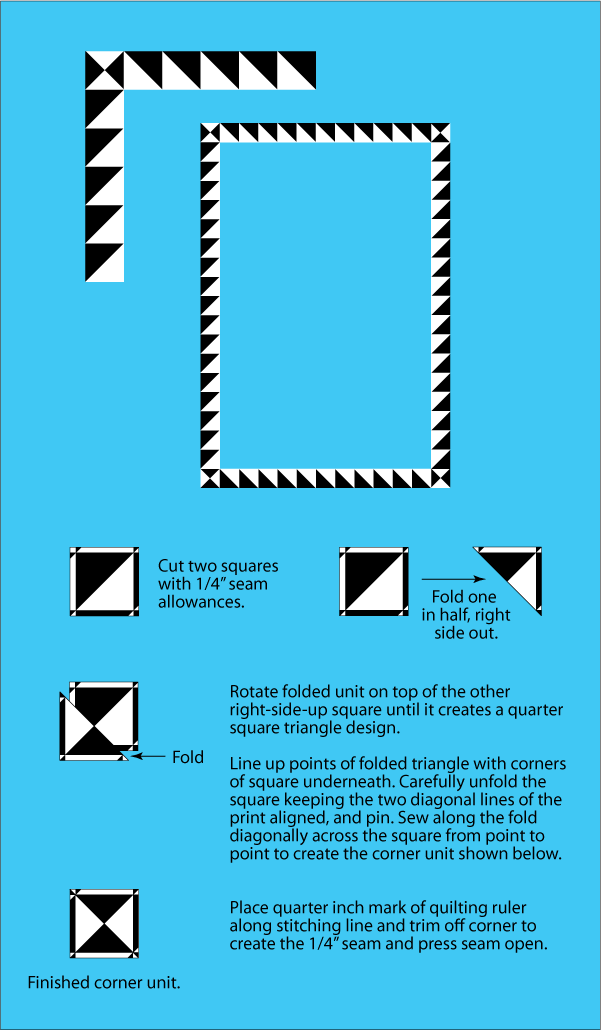
Insert an hourglass at each corner where strips meet, rotating so the hourglass color contrasts with the adjacent strip color.
Another way to turn corners with half-square triangles is to use partial seaming to create the example below. Size your finished block or quilt to an even (or odd) count of full, uncut half-square triangle units (then don’t forget to include seam allowances, which are not shown in the illustrations). Cut each Sashing Stash strip that will surround the block or quilt 1 half-square triangle unit longer than the finished size of your block or quilt, making sure to include 1/4″ seams all the way around the counted unit. Sew the first strip of Sashing Stash to the block, leaving 1″ of seam unsewn at the end that sticks out beyond the block. Pay attention to the orientation of the dark and light edges of the Sashing Stash strip so that they are all oriented the same way around the block. Sew the other 3 strips to the block, in order, until you have all four border units sewn on, then finish the last part of the first seam.
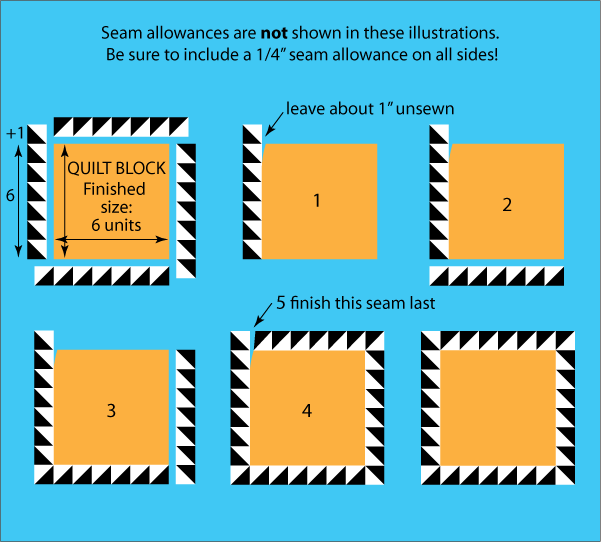
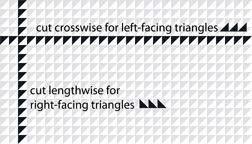 NOTE: Left-facing dark-on-the-bottom triangles are achieved by cutting crosswise, while right-facing dark-on-bottom-triangles are achieved by cutting lengthwise.
Flying Geese
The Flying Geese borders shown below work with or without the black edge banding. The top two have mitered corners which maintain the edge, and they also illustrate how rows of Geese can “change direction” in the middle of a side to achieve a more symmetrical look.
NOTE: There is nothing wrong with Geese chasing themselves around a border arrangement, nose to tail!
The third border at the bottom uses a solid color block (the same as the darker color in the Sashing Stash fabric or a contrasting color) to turn the corner. Geese can arrive at this corner “nose in” pr “nose out,” making it optional whether to change direction in the center of each side.
NOTE: If you choose to have your Flying Geese change direction at the center of each side, this meeting point can be tail-to-tail, forming a square-on-point, or nose-to-nose, forming an X shape.
Equilateral Triangles
Like Half-Square Triangles, rows of Equilateral Triangles can have all-dark or all-light outside edges. The mitered corner designs of the top two borders shown below are achieved by carefully joining the last triangles at the ends of the meeting strips, making tiny but careful adjustments to create the symmetrical corner shapes, sewing, and giving the resulting corners a good steam with the iron to shrink to size.

The third example shows the insertion of a solid color square, using the darker border color for a light-outside border, the lighter border color for a dark-outside border, or an entirely different color.
Squares-on-Point
 Turning corners with Squares-on-Point can be fairly easy. Just miter the corners, with or without outside banding. The resulting shape at the corners is usually graphically satisfying. However, if you don’t like it, try letting some portion of the last square in line abut a solid color corner, either in the darker border color or a contrasting color. You can also stop the Squares-on-Point border before it reaches the corner and fill in with solid color fabrics.